Friday, October 30, 2015

We spent the night in jail and visited Death Row!

Yup, you read it right! We spent the night in Jail in Ottawa! We even visited Death Row. I am a Beaver Leader and we went with the Cubs to Ottawa. We spent the night in Hi-Ottawa Jail. This is a hostel that was a 150 year old former Carleton County Gaol. 

The architecture of the old Jail has not been changed. 

This place is really spooky and full of history. I did not know that it was illegal for Canadians to be in debt. If there were charges brought against them they could go to jail (with their wives and children!) to work off their debts. This is OBVIOUSLY before MasterCard and Visa. 


The Zombie Apocalypse  


The top floor was death row. The floor has remained as it was when it closed down in 1972. The last few cells you can rent out and actually sleep in.


As you can see they are NARROW. I don't know whay you would want to sleep there.


Here is a view of the gallows. It is still afully functional gallow. Not that this is legal anymore in Canada, but if it were to become legal tomorrow this is where you would go.

The execution of Patrick Whelan took place on February 11th, 1869 for the assassination of Canadian politician Thomas D’Arcy McGee. It took over 4 minutes. Shudder!


I just love Ottawa! Every time we go there I love seeing the Peach Tower and all the monuments. 


Thursday, October 29, 2015

New Look 6164 Cardigan , a long overdue finish


New Look MIsses Cardigan, Dress and Skirt 6164Simon started a nice cardigan for me. He started it last year and he stopped at the hem. The issue was that he chose a gorgeous fabric from Tonitex. It is a thick textured black knit. The fabric is too stiff and heavy for this pattern. He did his best to fix it.

I am in the mood to clean up all the unfinished projects and move some of my stash! This was in my bin, so let's have at it.

 You can't see well because the fabric is black but what i did was sew the label down so that it stays in place. Because it is a stiff and thick fabric it doe snot flow and hang as it should.


I will not complain at all. Simon made this for me and all I did was the hem. I love the fabric. I think it would do well in a blazer type of jacket.


You can't complain when your man makes you something! I like the lines of this jacket and I love the fabric. It is just the lapel that is not 100%. I think I will make this again this week, but in a better fabric, one more suited.

Tuesday, October 27, 2015

Jalie 3353 Cocoon Carigan

Jalie Cocoon Cardi 3353I am on a mission to use up the patterns I bought as well as reduce my fabric stash. The bets way to accomplish this is by using fast and easy patterns. Instant gratification. I used Jalie's 3353. I bought this pattern not too long ago along with some nice lightweight aqua knit.
 Jalie defines this pattern as a Dolman-sleeved, loose-fitting open-front cocoon cardigan with banded round hem that is longer in the back. Cuffed sleeves that stay put when you lift them (but not on me!)

I traced out size U and made no adjustments. The sleeves are made to be short and with the cuff the are perfect length for me. Next time I will make the cuffs tighter.

I will definitely make this pattern again. It is quick and easy and fun to make. But first I have many more patterns to play with.

I glanced at the instructions but there are not many details. I took a class on stretch knits and we learned how to install collars and cuffs. If I did not have this class I think I would have Googled how to do these steps.I am surprised that Jalie did not give more instructions, but hey no biggie. I got it. The only difference I did was add topstitching to keep the cuffs and collar in place. Perhaps she tells you to do this, but I did not look at the instructions enough to notice. I also serged my seams.


Sunday, October 25, 2015

Princess Peach Halloween Costume


So I have started my Halloween costume. I wanted to
make Princess Peach last year but never got around to doing it. I even bought the fabric and all the notions. This year I wanted a warm costume. Here in Montreal it is C-O-L-D at the end of October. I wanted a costume I could fit over my jacket. I chose Simplicity 2853 thinking I would do some sort of cat, version "D". 


This is what I am basing my costume on

One weekend I trekked out to Club Tissus with family in tow. Simon had the 
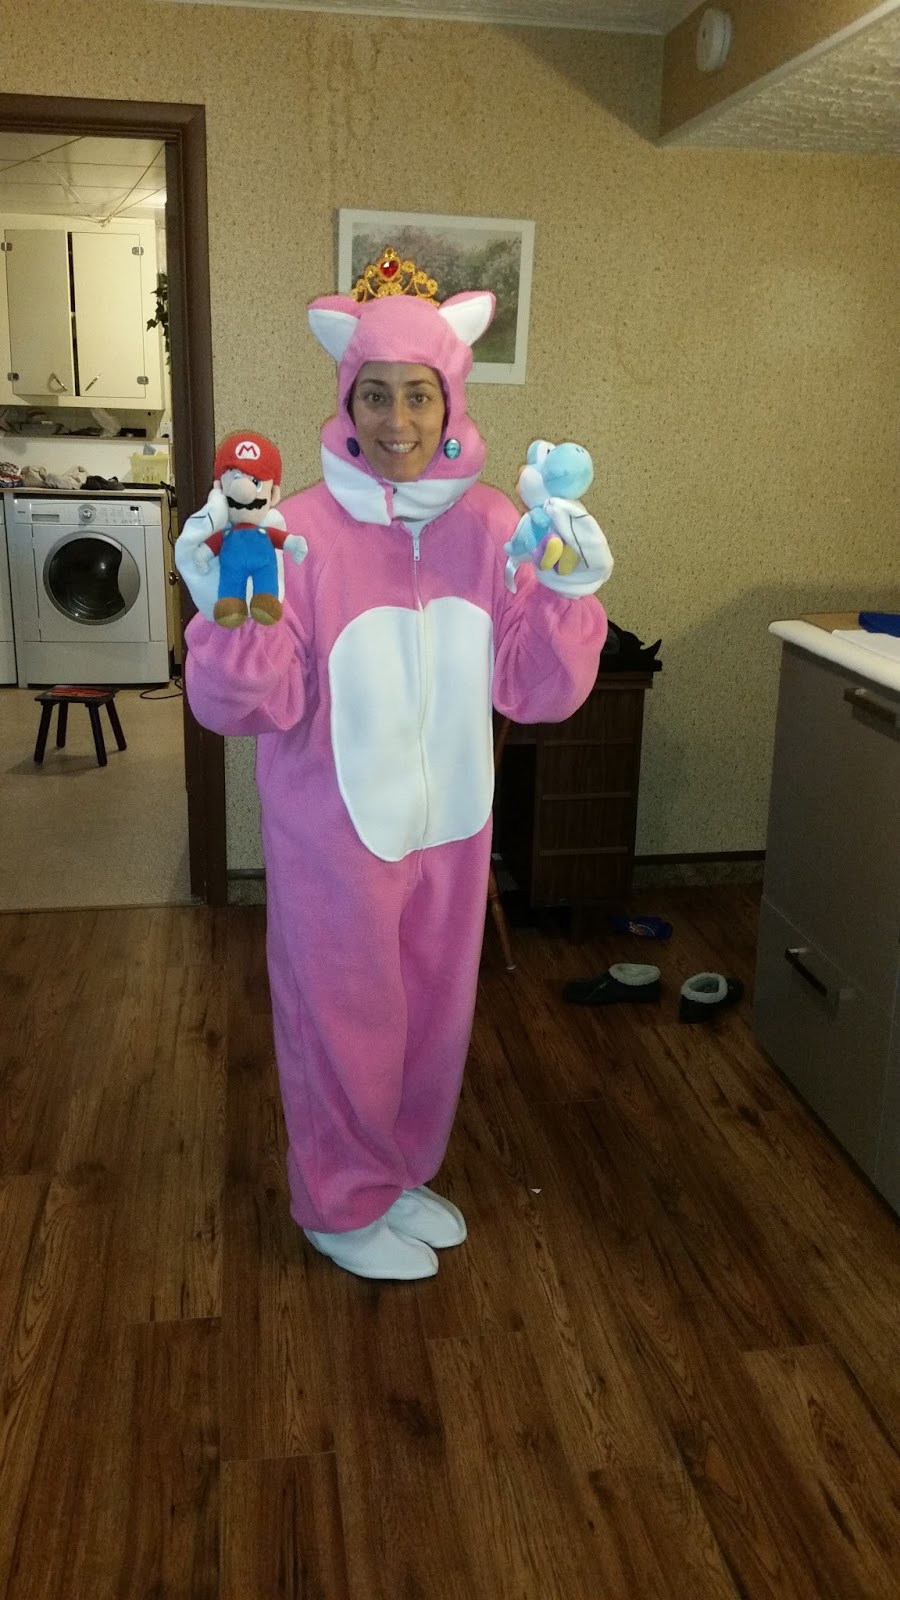
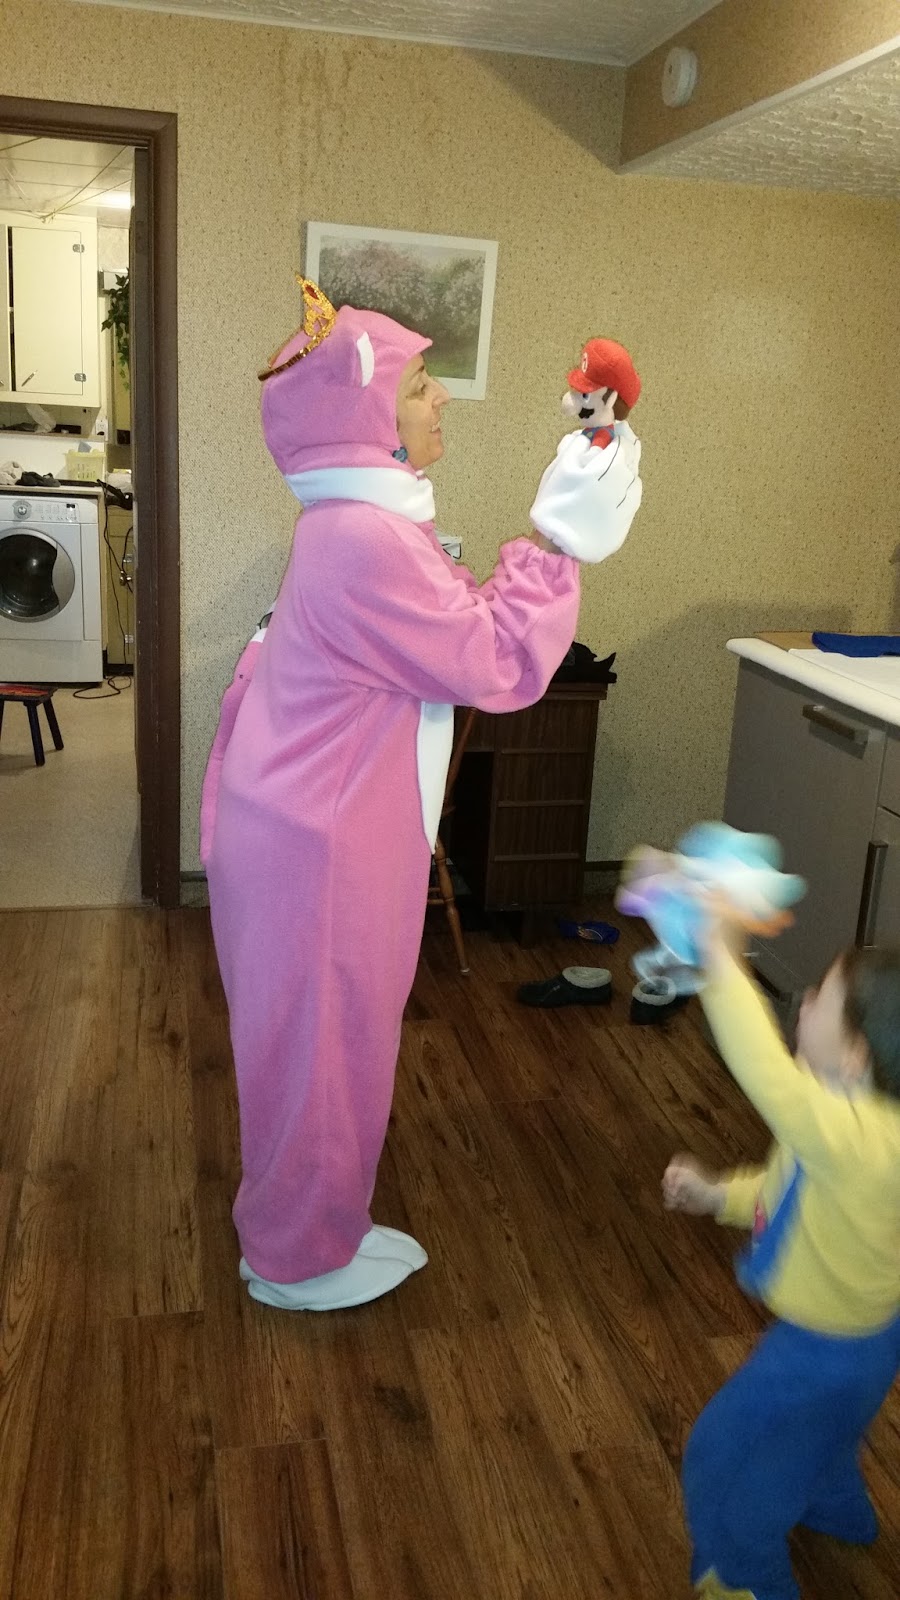
brilliant idea to do Princess Peach, but the kitty version from Mario 3d World. It is the perfect choice as this is the WiiU game that we are currently playing together, and I still get to be warm and not have a jacket cover up my costume! 


One afternoon I traced out the pattern and cut it out. I want to sew this project with Simon. With 2 kids that demand my attention the only time we can sew together is after they go to bed. Usually we are drained by that time, but we MUST make the commitment. 

The hardest part to start was cutting put the fabric. We have Pink, White and lining. Simon hacked the hood to make the sides poof out and to do the color blocking. He also did the color blocking on the tail. So the pattern modifications and cutting out of fabric took about 3. That was day 2.

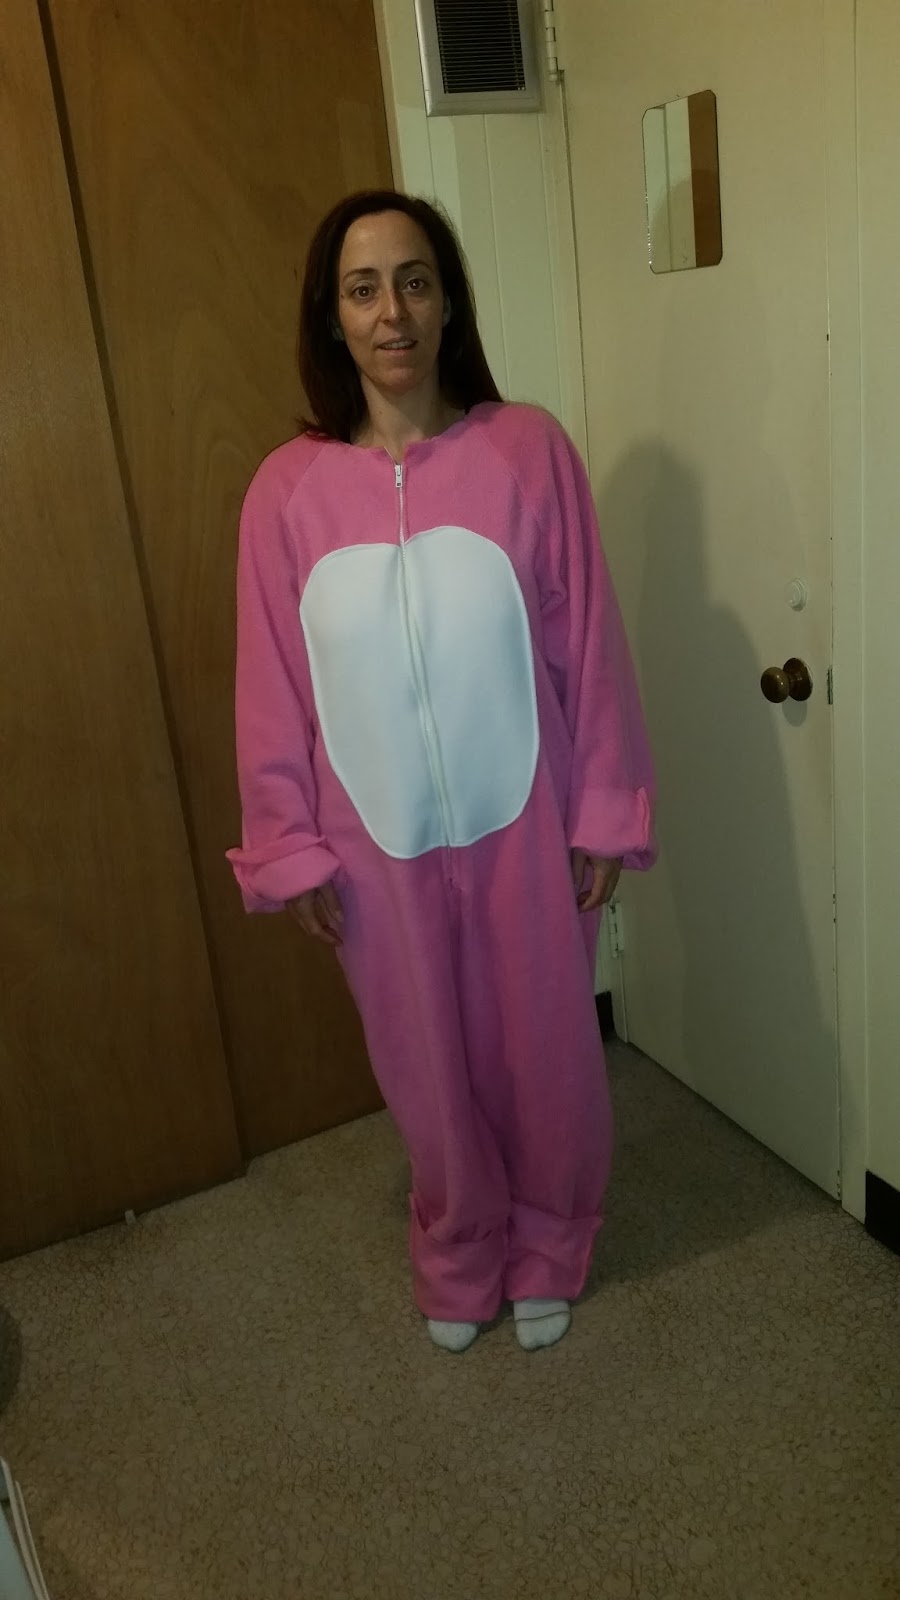
Day 3: We sewed the white part to the belly and sewed the 2 front pieces together. Believe it or not that took 2 hours. I wanted to do everything up until the zipper, so we are on target.


Day 4: We sewed the zipper. But we must redo it. Simon wanted to do the zipper his way, and he is good with zippers, but he did not realize that I did not want to see the zipper. I want it to be hidden. It is well done, but not to my liking. I know I am picky, but I want to be able to show this costume off! While Simon was sewing the zipper he broke a needle and my sewing machine was not picking up the bobbin thread after. I thought it was broken! I started to hyperventilate, freak out, panic. Simon fixed it. It works, all is well in my World.


I stayed stitched the arms and attached the front arms to the front body. i am looking like the Pink panther at the moment. That would work, he was my Favorite when I was a kid!

Day 5: As we were not happy with the zipper placement Simon spent 1 ½ hours ripping out the seams for the zipper to redo the placement. It is now not as noticeable. It is not 100% how I would want it, but whatever, it is nice enough.


We then made the tail. I want to be able to have a bendy tail. We took electrical wires; doubled it and duct taped it together. We then wrapped it with the stuffing. We have first tried it with 4 ply of wires, but that would be too heavy. 2 ply of wires is just perfect. 


The tail right now looks a little...odd. Let's say it looks like a Swan?


Sewing the back together was a cinch! I stopped at the arms as I was getting tired. We are making great progress. The 2 sides are sewn up, and tonight we will put all the pieces together and start the collar! 

Day 6: Now all we had to do was place the back arms on the back pieces and sew the front to the back. You would think this is a quick process. I would say yes but I wanted to take my time. The tail is rigid due to the way we made it and it pulled on the material. I had to go slowly or else the material would shift while sewing. We spent 1½ hours on this part and I was tired, so we called it a night before the collar step.


Here you can see the back, it came together nicely.


Meow! I will need to shorten the arms and legs, but that will be the next step.


Day 7: So the collar is a straightforward easy application. It would be if it fit the collar. I checked the piece against the pattern, I cut it out properly. I believe that with our walking foot we were not sewing with the proper seam allowances. I re cut the facing on an XL and it was still to small.
Now I have to mention that my sewing table surface ROCKS! I have the cardboard overlay for pattern tracing and material pinning. But I also have an ironing surface. Scooch the cardboard over, and Voila! I can iron directly on the top. Soooo convenient.


To fit the facing on the collar I pieced the 2 facings together to make a longer one. You fold it on the inside, so you do not notice that it has extra pieces sewn at the end.  You tack it down to the seams, and it is not noticeable. Either it is us or the pattern was off. I compared the material to the pattern and I was good. I did not cut the incorrect size.

So much for wanting to hem the arms and legs. I felt good about what we got accomplished. Yes, it was only the collar. that got sewed tonight. Yes, we made a big mistake. But we were able to find a solution and it looks like it was intended to look. Would I prefer to do every step perfectly? Yes, but hey we are new to sewing. Mistakes happen, That is how you learn. 

We will be going camping and I will need to pack, so we will be taking 3 - 4 days off of sewing. When we come back we will be all relaxed and ready to go! A week of late nights gets you very tired and cranky. 

We went camping, I had a weekend away with Beaver Scouts and then Simon got the flu. My Halloween party with Scouts is no longer on Friday, it is on Wednesday. Simon still has the flu a week later, but we NEED to finish this. In comes Super Nana. Because Simon is so sick I actually cancelled the adults only day at Laronde for Freight Fest. That is how sick he is. NO haunted Houses for me this year. This is a BIG deal for me. I called my Mom to ask her to take Sam for the day. I can't sew with a screaming 4 year old.

So this morning we did the hem on the arms, the gloves and the spats. I added thick black zig zags to give the impression of hands.


I just KNEW the hood would give us troubles. Either it is because we modified it, did color blocking or the pattern is off the center piece if the hood does not line up. We had to recut the center piece. And the steps are not lined out very clear for the ears and hood. Due to the fact that there are views A B C D it is not fluid. They have a bold heading for Views A and B for the ears, but none for C and D. I was like WHAT??????? You need to read the entire thing many times and then figure out where to go. 

 
I would not recommend this patter to a sewer just starting out. Yes there are details on how to sew with fur, but they are not as detailed with their steps. Perhaps if there were less versions it would be clearer. The steps are not hard, just time consuming. And you need to know many techniques, elastics, lining, zippers, etc. It is not a straightforward project, but it is ok for a moderate to advanced sewer.

Happy Halloween


Organizing my stash

So now that my Halloween costume is done and I completed a tunic today, I was inspired to organize my fabric. It took me several hours (I am sure, I did not take note of the time), but I got it done. sewing.patternreview.com has a cool new feature of Fabric Stash. I am up to date on my pattern stash but the fabric was a new feature for me. I took to it and measured my fabric, took a photo and entered it. Now I see just how much fabric I really have.

Time to get sewing. I wanted to make a one piece suit for hot yoga from Jalie 3138. There are no patterns that have a built in bra. I will try my hand by adding in lining, power mesh, bra cups and elastic. We will see how it turns out. I have 1 meter of green Lycra from a bathing suit that never got made. And the notions were also for a bathing suit that never got made. Time to reduce the stash. I will post on how this goes later.

Jalie 3245 version B


Jalie Raglan Tee, Racerback Tank and Tunics 3245


I bought this pattern a while ago. I love raglan shirts. They are quick and easy to make. We just finished my Halloween costume yesterday and I have been in the beat of sewing. I really want to use what I have. Time to reduce my stash.
We just ordered 10 patterns that will help me reduce my stash greatly. The patterns are all simple and quick. I don't have a lot of time so the fewer the pieces, the better.
 We bought 5 meters of a nice stretch blue striped fabric about 2 year at Tonitex. Even after this shirt I will have enough fabric leftover to make a dress.

 I made version B in size U.


The previous evening I was thinking about marking materials. This is a patterned material and my marking tools may not be seen well. When I made the Kwik Sew Raglan Sweatshirt I had some head scratching moments trying to decide which piece was what. The arms and body were so wide they all looked the same. On this blue material it is hard to see which side is the right side and which one is the wring side.  

So how to mark it easily? I decided to tie a thread and have the long pieces on the wring side. On this pattern it is easy to see which is the front piece and which is the back, but I wanted to test out my theory. I used white for front and orange for back. Easy-peasey. I think I will use this technique more often. Especially on knits. I read in my Reader's Digest Complete Guide to Sewing to use this technique for marking. I think I will use this from now on to mark my dots.


I strated at 6:30 am and by 10:30 I was done. I traced the patter, cut out the material and sewed it. This included eating breakfast, taking care of the kids and doing laundry. 

I am really happy with my collar application. I used the Chanel application that we learned in our sewing class. I am not sure if this is how Jalie says to do it, but I did not look.


I used a double knit needle to hem the arms and bottom. It feels good to have some more practice and be pleased with my results.


Friday, October 23, 2015

Kwik Sew 2017 - part 2

I found the Small to be very large and I wanted to make another one but in X-Small instead. I also took the shorter waist line. I had an brown version of the pink material leftover in my stash from the same Fabricville buy.
I traced the pattern, cut out the material and sewed it up in about 2 hours. i was going slow, picking up kids from school, etc.

I am much happier with the fit of the X-Small. I am proud of my topstitching and cuff/band insertion as well. Practice makes perfect. I wore this one to work today!


If you take your time the insertion of cuffs and bands is a simple process. I used color coded pins for the cuff and the shirt so that I would not get mixed up. I divided the cuff into 4, using green pins. I divided the shirt into 4 using red pins. I pinned the cuff to the shirt using a White larger pin. This way I could visually ensure I was pinning properly. I am a visual person and I found this reduced confusion while sewing. 
If you lay the shirt flat and pull the rib to meet the 1/4 pins you will have proper tension throughout. The shirt has the least amount of stretch and the rib is stretchy. So you want the rib to match up to the shirt.