Thursday, October 26, 2017

Winter Jacket Course 2017

I am taking the winter jacket course again with Mme Dorothee Barnes at Club Tissus in Laval. Simon and I originally took the course together in 2013. We both made our own winter jackets, and we still wear them to this day (Ok, not today as it is UNUSUALLY HOT this late October, but you understand what I mean!) You can see My Jacket and Simon's Jacket here.

We were so happy with the process that we bought all the materials to make me a long red jacket. We planned on making a version of Kanuk's Blainville jacket, but longer. Guess what happened? Yup, you guessed it. It went in the stash pile. I stored everything in a Rubbermaid bin.

So enter 2017, 4 years later. I signed Simon and I up for the course. We ended up with only me taking the course. With Simon starting a new job that finished much later and a strain on babysitting, it is only me.

It is much easier on the time budget working only on one coat at a time!
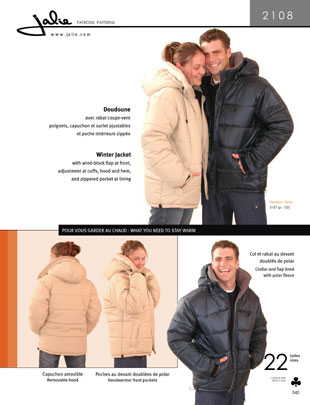
Image result for jalie 2108


We used Jalie 2108 as the base model for the jacket. We added princess seams, changed the collar, the width, the length, just about everything! I wanted a nice long jacket for when I wear skirts to work. Something sleek with not much details. I added a band in the front middle for details.

I am now stuck on the hood. We have decided to purchase removable fur like in the picture above. We are not sure if we want to add a drawstring to the hood, and we are waiting on the color of the fur to decide the color of our polar blizzard fleece for the collar. Other than that after this week's class I will be done!


Here is the exterior shell. I created the princess seams and sewed the pockets in the seams. I added a horizontal band for detail.

You can see the exterior portion of collar was made with exterior nylon and 200g earthwrap.


As you can see the pockets do not lay flat. What we ended up doing was to see a piece of fabric from the pocket to the edge. That way the pocket stays in place. A small detail but trust me in the end it makes a big difference!


Here is the back of the jacket: the collar and zipper shield


The shield is 5cm longer than the zipper.


The interior lining with the 200g Earthwrap insulation does not look like much. I attached the polar fleece for the collar to the lining.

The inside is much nicer to look at. I added a jupette, not a drawstring.

I HATE attaching the jupette and then the zipper. So we added snaps directly on the facing.

Another detail is to add a hook to hang up your jacket.


Here is where I am with the hood. I attached the zipper but I did not sew the interior tot he exterior shell.

I am not adding a drawstring or side shields on this hood.


I am adding removable fur to the hood collar. I need the sew a shield with snaps to add to the fur, and snaps to the hood portion as well. To do this I need to go to the fabric store and use their snap press. So I have to wait to sew up the hood to do this.


This is the first time we use the magnetic snaps. A word of caution: Make sure your flap is wide enough, or else you will be cursing when you sew your lining to the exterior.

I added the duct tape to the shoulder seams. This will make it even more waterproof during those nasty storms. And no, it will not come off. We don't have regular duct tape, but we have the tape used on the exterior of the house, so you KNOW it will stick!


Here you can see the flap that Simon sewed on the pockets to keep them in place.

That added detail makes the lines of the jacket more professional and less homemade.


It was very difficult to sew the arms. I can't explain how we sewed the the lining and the exterior together, Our first attempt we ended up with the two sewed up so that we could not put on the jacket. OOPS.
I brought up a YouTube video and then it made sense. You have to go from the bottom, pull it out and place the right sides together.


I am a visual person, so don't ask me what we did, but it worked!

It is a good thing that we have the Janome MC 8200. There is a lot if room to the right of the presser foot. Otherwise it would have been pretty cramped!

Now all we have left is the bottom, turn it out, sew up the side arm seam, topstitch and finish the hood (snaps for fur, etc)


A trick Simon used when sewing the cuffs was he pre-twisted the jacket so that as he sewed the jacket unwound instead of twisting. It made it move easier under the machine. 

So off to Club Tissue to use their snap machines. Now I say bite the bullet, buy 2 snap machines, be done with it and install them in your house. One for the top, one for the bottom rivets. No need to change the bits. Why spend the money you ask? Have you ever been to a fabric store and not spent money? What we spent today on material for yet more projects I could have easily bought 2 machines and bits. 

Ok snow I am ready!


Thursday, May 11, 2017

Cub Scout Thank you cards and a Mother's Day Card.


I bought the new Cricut Explore Air 2 machine. Here is my first project, a Mother's Day card from is to My Mom. We are very pleased with the results.
 It was really quick and easy. The first time we used it we did not know that there were 2 types of mats. A sticky one, and a less sticky one for paper. Now we know, lol!
 It even cut out the envelope, so cool!

Then I got out my laminator and made these cool labels. Our Scouting year is coming to an end. I found these cool labels for Cub Scouts and printed them off and plasticized them.

These will be for my fellow Beaver Scouters. My youngest saw this box and keeps trying to eat them!

Here is the card I printed off. There is a song the kids sing when it is taking too long :

HEY AKELA, HOW MUCH LONGER? HEY AKELA, HOW MUCH LONGER? HEY AKELA, HOW MUCH LONGER? HEY AKELA, HOW MUCH LONGER? HEY AKELA, HOW MUCH LONGER?

Non stop, can get grating, lol

And here is the inside....

Tuesday, May 2, 2017

Next course: Custom Made Pants / Pantalon sur mesure

The next course that Simon and I are taking is how to sew pants tailored to our specific measurements. We have started off taking our measurements. There were so many of them. This week we are tracing our patterns and marking on them our specific measurements.

The course follows an old OOP Jalie pattern, 964. This pattern I did not have, I do have Jalie 966, and the pattern pieces are labelled the same, so I could use that pattern. But me being me I tracked down someone selling the 964 pattern on Kijiji and bought it. I also scored MANY other Jalie patterns and some cool pattern for winter snow suits,


Now the next pattern we needed was for Simon. We can't use the pattern we use in the class for his pants. I don't think he wants girl's jeans. I do have a few patterns from Kwik Sew. But I wanted a pattern that was more than 3 sizes S-M-L. And Simon wants to add all kinds of pockets and make them zip off pants.


I do have 977 in my stash, but the waist is an elastic drawstring. We could modify the waist and add a fly, but that seemed like a lot of extra work. Instead I ordered a PDF copy of 2107. You don't find too many patterns out there for men. This is a classic fit, good for shorts, pants and jeans. Simon will only have to modify the pattern to add a zipper. He is in heaven modifying patterns. He has so much fun!


Now that I bought the PDF pattern we had to print it, cut some edges and tape it together.

This is not a hard thing to do, it just takes more time.

But seeing as most patterns for men in Jalie are OOP and I couldn't find the pattern I wanted used or in store, we don't have much of a choice.

I am always on the lookout for specific patterns or items on Kijiji. I scored 19 patterns for $15. The pants pattern I needed for my class, the rest were a bonus! They have never been cut, only traced. They are in pristine condition. She even gave me envelopes of her tracings. As the kids got bigger they needed bigger sized shirts.

There is even a Kwik Sew book on sweatshirts with the patterns. The patterns have never been used.


We even have patterns for snow suits.


Now this one is my favorite! Simon asked if people went to work in their PJ's. Elastic waist with pockets, in funky patterns. Yup, I am SOOOO making this for him. LOL

Monday, April 17, 2017

Covering kitchen chairs in clear plastic


So we were given these nice chairs with a matching table. The chairs are comfortable, and the 2 minions like sitting on them. They are a good height and all, but they have material seats.


Anyone with young kids will understand our concerns. Each time they ate we had to put a towel on the chair of our youngest. He tends to eat standing up. Our kids don't "sit", rather they jump up and down. The food tends to end up all over the place. Pick your battles. I don't think they physically can stay seated, but the food goes into their mouths, so don't sweat the small stuff.
I had bought some vinyl a few years ago for another project and I never used it. I have one on top of the kitchen table to protect it, and I had one left over.


What a great idea! And Simon needed to replace his air tool staple gun that was left at an old job.

Removing the seat and cutting the plastic to cover the seat was easy. Simon even had a helper.

But once the staple gun game out with the air compressor the kids vanished to get away from the noise!

Here is the finished result. Now no more panic when Sam drops his pasta or cereal or whatever on him, the chair the floor, the walls. It is an easy clean up!


Sunday, April 9, 2017

Shopping in Montreal's Garment district

I finished work early on Friday (10:30am!) and Simon was off. On the rare occasion that we have both the time and no kids I wanted to take the opportunity to shop for fabric on St-Laurent and Chabanel. One does not simply pop in and out. Rather you touch, drool over the selection and dream of a land where you have endless supplies of time and money. I brought a list of fabrics I would like for the underwear class to keep us on topic. This helped impulse buys.

We went to Tonitex and found this gorgeous red scalloped lace.  We plan on making the Brazilian panties with this. And when I have the time the matching bra.


The below is what we bought at Stretch Text.

If you live in Montreal (or near) you must stop in and see all the lovely fabrics at Stretch Text. We stuck with 5 choices, a royal blue lace, a pink lace, a beige Brazil, and 2 prints.


The blue lace is not scalloped, it has a straight line edge. I can use this in other ways other than the Brazilian panties.


The pink and beige is really nice. My pictures do not do the pink justice here. Simon will make lace and solid panties with this fabric.
 We bought some funky elastics that will go well. The one time I find something new at Fabricville (but they only had 1 meter). Simon was thinking of creating something in this version.


The elastic goes well with both my fabrics. It really is a cool design. The beige will be solid neutral portions.


The prints will be for Simon's underwear. We will be doing the men's version next class. As Simon is the only man in the class I am sure we will be using his material for the demonstration during the class.


This one has the designers name on it.


The fun thing about Stretch Text is you can take home samples. If you have other projects you can take home swatches and make your decision at a later date.

I plan to show the people in my class.

Simon likes these 2 stretch velour blue prints.